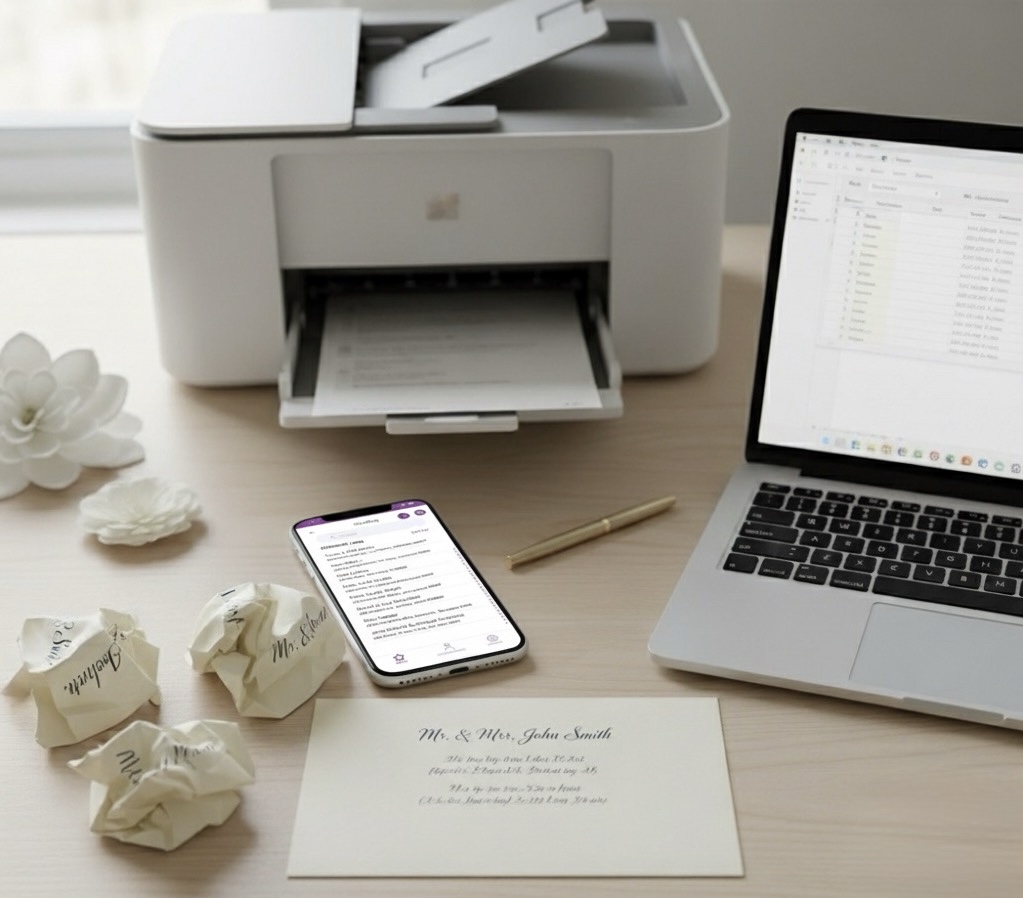
There’s a certain moment in wedding planning when you realize: you’ve collected 100+ addresses... and now you actually have to print them.
I’ve been there, sitting at the dining table surrounded by envelopes, swearing the printer has it out for me. Every test print looked almost right, but not quite. So I finally sat down and figured out the right way to do it... no calligrapher, no overpriced printing service, just a clean export from TextMyLink, a spreadsheet, and a bit of mail merge magic.
Here’s the full, detailed walkthrough so you can print your envelopes (or labels) perfectly the first time.
Part 1: Prepare Your Data and Word Document
1. Prepare Your Address List (Data Source)
Start with your guest list, ideally the one you already collected with TextMyLink.
- Open your event in the TextMyLink app.
- Tap Export → CSV to download your guest list.
- Open that CSV in Excel or Google Sheets.
Here’s the good news: if you’re using TextMyLink, it’s already formatted perfectly. The app automatically organizes your guest information into clean, labeled columns, so you can plug the CSV straight into Word, Google Sheets, or Canva without fixing capitalization, spacing, or headers.
Important tip: format your ZIP or postal code column as Text, not Number. Otherwise, Excel might drop leading zeros (especially for New England ZIPs like 02110).
This spreadsheet is your data source, so save it somewhere easy to find, like your desktop.
Example TextMyLink Formulas for Formal Names
If you want a formal top line on your envelopes or labels, you can add a new column called Formal Name in your spreadsheet. This lets you print “Mr. and Mrs. John Smith” instead of just “John Smith.”
These formulas match the exact TextMyLink export column order:
Column Order (A → R):
- A: Title
- B: First Name
- C: Last Name
- D: Email
- E: Phone Number
- F: Partner Title
- G: Partner First Name
- H: Partner Last Name
- I: Partner Email
- J: Partner Phone Number
- K: Address
- L: Address 2
- M: City
- N: State
- O: Zip Code
- P: RSVP
- Q: Partner RSVP
- R: Comments
Simple (individual guest)
=B2 & " " & C2
John Smith
With title (individual, skips if title is blank)
=IF(A2<>"",A2 & " ","") & B2 & " " & C2
Mr. John Smith
Couples (auto skips if partner is blank)
=IF(F2<>"",A2 & " " & B2 & " " & C2 & " & " & F2 & " " & G2 & " " & H2, A2 & " " & B2 & " " & C2)
Mr. John Smith & Mrs. Jane Smith
Once you’ve added Formal Name, use it as the top line in your Word Mail Merge or Canva design for a polished, personal finish.
2. Start the Mail Merge Process in Word
- Open a new blank document in Microsoft Word.
- Go to the Mailings tab on the top ribbon.
- Click Start Mail Merge → Envelopes (or use the Step-by-Step Mail Merge Wizard if you prefer guided setup).
3. Set Up Envelope Options
The Envelope Options window will pop up.
Under the Envelope Options tab:
- Choose your envelope size (A7 is common for wedding invites).
- Adjust your Delivery address and Return address font and position if you want a specific look.
Then go to the Printing Options tab:
- Check the Feed method illustration so you load envelopes correctly for your printer.
- Click OK when it’s set.
Word will now resize your document to match the envelope.
Part 2: Connect Your Data and Insert Address Fields
4. Connect to Your Address List
- Go to Mailings → Select Recipients → Use an Existing List.
- Browse to your saved TextMyLink CSV or Excel file.
- Choose the correct worksheet if prompted (usually “Sheet1”).
- Click Edit Recipient List to filter or remove anyone you don’t need, then click OK.
You’ve now connected your guest list to Word.
5. Insert the Delivery Address Block
- Click in the main area where you want the address to go (center of the envelope).
- On the Mailings tab, click Address Block.
- Pick your preferred name format.
- Click Match Fields if the street or city fields look off, then map them manually.
Pro Tip: If your preview shows uneven spacing or extra blank lines, delete the «AddressBlock» and insert each field yourself. Crucially, use a soft return (Shift + Enter) after every line, like after «Formal_Name» or «Address». This forces a clean line break without adding the extra paragraph spacing Word loves to insert, giving you full control over how tightly each line prints.
Once everything looks good, click OK.
6. Add Your Return Address (Optional)
If you didn’t include one in setup, type your return address manually in the top-left corner. You can make it elegant later with a script font or color.
Part 3: Preview and Print
7. Preview the Results
- Click Preview Results on the Mailings tab.
- Scroll through a few records to confirm spacing, alignment, and fonts.
If names or lines look uneven, adjust now. Smaller fonts, around 10–11 pt, often look cleaner on smaller envelopes.
8. Complete the Merge and Print
When everything looks perfect:
- Go to Finish & Merge → Print Documents.
- Choose All to print your full list, or Current Record for a test.
- In the printer dialog, make sure the paper size matches your envelope size.
- Load one test envelope first.
The #1 Envelope Printing Hack: Use the Rear-Feed Slot. If your printer has a rear-feed slot, always use it. Envelopes feed much straighter and print cleaner through a rear tray than the curved front-loading path, which eliminates most alignment headaches.
If the test looks perfect, load the full batch and print.
Bonus: Printing Address Labels in Canva (If You Want a Design Touch)
If you’d rather use labels instead of printing directly on envelopes, Canva makes it easy and lets you match your stationery style.
Here’s how to do it:
- Go to Canva.com and search for Address Label Template.
- Pick a design that matches your theme and customize fonts and colors.
- Open Apps → Bulk Create.
- Upload your TextMyLink CSV.
- Insert placeholders for each field, such as
{Formal Name},{Address},{City}. - Click Continue → Generate, then export as PDF Print.
- Print on full-sheet sticker paper or Avery 5160 labels.
It’s mail merge meets design, without the font headaches.
Why Start With TextMyLink
The hardest part isn’t printing, it’s collecting clean data. TextMyLink solves that from the start. You send one text link, guests enter their info, and your list stays tidy and current.
Even better, the export is already formatted for you, so it drops straight into Word or Canva without extra editing. One list can carry you through save-the-dates, invitations, and thank you cards without rebuilding anything.
Takeaway
Printing your own wedding envelopes or labels is totally doable once you know the steps. A clean TextMyLink list, a spreadsheet, and a few clicks in Word or Canva... that’s all it takes to look like you hired a pro.
If you’re in the middle of this right now, hang in there. Do one test envelope, adjust once, and celebrate when the first perfect one comes out. The little victories matter during wedding season.